Showing posts with label oekakiben. Show all posts

Tuesday, February 22, 2011

Going to take things in a slightly different direction from now on.

Here's another reason for me to appreciate Milk Products Media...this last project has really sort of helped me find footing in terms of what makes me happiest in the world of food art.

I began with bento, and I love bento, but people have a lot of bento-expectations that I don't seem to fit. I like the neat, clean frame and the challenge of a tiny scale, but in general I'm not so great with the rules. I don't mean that in a self-aggrandizing way, I just want the option to make something bigger if that's what I feel like doing at the moment.

Somewhere back in the 80s, I was transported via TV to "The Land of Dairy Queen", a place with the most fascinating topography I'd ever seen. There were chiseled chocolate mountains ringed with dry-ice fog, gloppy pineapple-sauce waterfalls and rivers that oozed thick with hot fudge. There may have been some soft-serve peaks somewhere in there, too. I think, somewhere in the murky recesses of my mind, I've been imagining things as food (and food as things) ever since. Which is great, but I can't necessarily fit it all in a 5x5" box.

By sheer necessity (ease of photography and videography, among other things), I had to work on a larger scale this time, and it was completely liberating. I'm not up to Carl Warner's immense landscapes (and I'm a lousy photographer with a small budget, so he's got no competition there), but I liked not having to fit everything into a tiny space and worry about it being appetizing to preschoolers. (Not that I don't worry about feeding preschoolers. I have one. She likes oranges, green tea and idlis.)

I'll still do bentos. But there'll be bigger stuff too.

Monday, February 21, 2011

Coming soon!

MILK teaser from Milk Products on Vimeo.


Been working with the fun folks at Milk Products Media on a top-secret project. I've never done food art at quite this scale or pace before and it blew my mind a bit, but what a great experience.

More soon!

Sunday, September 6, 2009

Lest anyone get the wrong idea...

I do food art to entertain myself. When I take a picture and put it up there on flickr, it's "hey, look at this silly thing I made out of food." That's it. I'm not trying to persuade anyone that what I've made is scrumptious, or precisely balanced nutritionally, or that it's what they should be feeding their kids. It's just a picture made out of food. I do my own thing, I make pictures out of food, that's where it begins and that's where it ends.

Now, there does exist a (large) bento community with whom I'm more-or-less loosely affiliated, in that a lot of my stuff shows up in bento boxes...I make oekakiben (picture bento). I'm not a mainstream bento-maker, though. If you're looking for nutritious ideas for an adorable lunch to send off with your preschooler, there are lots and lots of people who will have great information for you. You can browse flickr and see all kinds of appetizing combinations and great ideas for bento lunches. Do what you like. Bento is what you make it.

I eat what I make because I don't waste food. Blue rice, for all the reaction it seems to inspire in people, tastes like regular rice. It's just blue. It's tinted with natural food coloring, it's not harmful, it's just blue. The same goes for applesauce tinted blue and anything else I might have gone nuts and tinted blue at some point. Some people are fascinated with blue food. Some people find it repulsive. If you don't like it, you don't have to make it or eat it.

It's your choice. Everything is your choice...what ingredients to use, what recipes to make, what the nutritional balance should be, whether or not your rice is an orthodox color. You choose whether your sandwich looks like Hello Kitty or a monster or a good old no-frills sandwich.

Besides the me-vs-most-bento-makers comparison being a total apples-and-oranges thing, what's wrong with a little adventure? In my flickr profile (where I try to catch people on their way to announce to me what they think of blue rice), I mentioned chef Cat Cora and how fun her innovations can be. Cotton candy on soup gave her audience pause, but they swirled it in and found it delicious. This stuff can work.

Have you ever flipped through a magazine and seen one of those beef council ads, with the landscapes made of beef? There's brown sugar sand and sour cream snowcaps. Would you eat beef with brown sugar and sour cream? Probably not, but hey, it's a cool picture made of food. If it gives you a "hey, what if I..." moment, so much the better. And that's really all I'm doing.

Hope that helps clarify some things.

Sunday, July 19, 2009

The gallery opening was wonderful...


I really enjoyed meeting everyone and the three-hour reception just flew by. I was amazed by how many people came in off the street to have a look.

It was a great chance to help broadcast the merits of bento, and wonderful to see lightbulbs going off in people's heads as they got inspired to do their own thing. People were also very interested in information about natural food colorings and a lot of people took literature on the colorings with them. The sake and plum wine at the wine bar were also greatly enjoyed ;)

Having a gallery show was a wonderful experience and I'm really grateful to have that opportunity. The opening reception was a lot of fun.

My bento images (not the fresh ones, but the photos) will be hanging in the Art Space of Yellow Springs, 108 Dayton Street, until mid-August. The gallery was open to the public on that first evening, but by appointment the rest of the time. If you'd like to see what's there, email me or the Arts Council...I can open up the gallery if there's a free spot on their schedule.

Here are some photos
from the opening reception. Thanks again, everyone :)

Monday, January 5, 2009

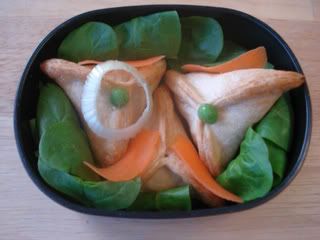
Quick and easy bento-size samosas...


We lovelovelove our spicy food around here. I was raised around desis and eat idlis and sambhar like there's no tomorrow; my boyfriend puts tabasco sauce on everything he eats.

There are some frozen "cocktail" samosas available at some Indian grocers, but I always find them expensive and a little greasy. The savory filling is the most appealing to me, because it can be customized to taste. I prefer my crusts to be dry and flaky, so I stayed away from the recipes that included a deep-fry stage. I experimented a little and came up with a combination I really like. You'll need:

  • 3 or 4 medium to large red potatoes, boiled in skins and cooled
  • 1/2 small can of baby peas (I use LeSueur)
  • 1 bottle of your favorite hot sauce (I use various types of tabasco)
  • jar of curry powder (I used Madras Hot curry, which oddly enough is not all that hot)
  • other spices (cinnamon, coriander, peppercorns, etc) to taste
  • 1 package refrigerated, rolled piecrusts...decent quality brand
  • drinking glass
  • small mixing bowl
  • teaspoon
  • fork
  • baking sheet
  • oven preheated to around 400 degrees F

First, take the cooled potatoes and slough off the skins with your fingers. They should peel off easily. Transfer the potatoes to a bowl and mash lightly with the fork...you don't have to whip them, but keep the chunks small. Add the half-can of peas and stir until well-integrated. Add hot sauce, curry powder and other spices to taste, mixing until incorporated. Set aside.

Spread out the piecrust on the baking sheet, one roll at a time. Use the drinking glass to cut out circles (it will help if you keep everything cool and dry...especially your hands...as you work). Stack the circles as they pile up, setting aside remnants to press out and cut again. From the two piecrusts, you should be able to get at least 15 circles.* When you've finished, fill the drinking glass with cool water and keep it nearby.

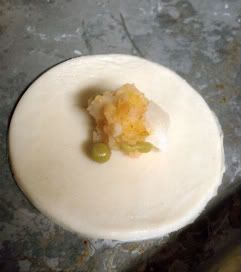
Using the baking sheet as a work surface, pluck one circle from the stack and use a fingertip to trace water around the outer edge. Take about half a teaspoonful of filling and place in the exact center of the circle:

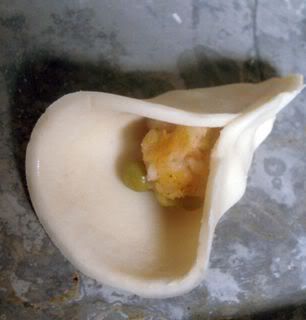
Now bring two edges up and over, and pinch half of it shut:

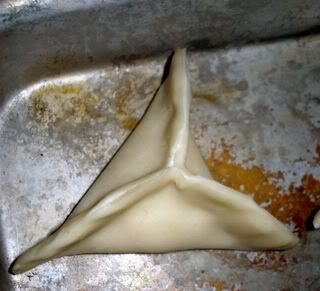
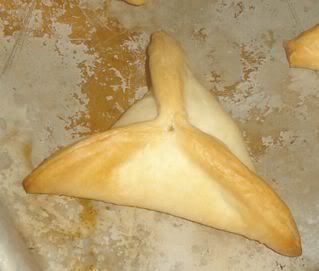
Bring the last edge up in the opposite direction, perpendicular to the first, and pinch the seams shut. The result will be a triangular little samosa:


Fill up the baking sheet, keeping them at least an inch apart for even heating (they don't expand much). Bake until golden brown:
A few minutes to cool and they're ready to eat. I like mine dipped in tamarind chutney, or even more tabasco sauce. Keep some milk or yogurt nearby, though, in case you're taken aback by the heat!


* I know there's going to be at least one person out there who tries to substitute prepackaged gyoza wrappers to cut out the piecrust step. I speak from experience when I say, don't do it! The gyoza are flimsier and more pasta-like and it just doesn't work at all, even when boiled first. It might produce a sloppy, spicy pierogi-wannabe, but not a samosa. ;)