Sunday, September 6, 2009

Lest anyone get the wrong idea...

I do food art to entertain myself. When I take a picture and put it up there on flickr, it's "hey, look at this silly thing I made out of food." That's it. I'm not trying to persuade anyone that what I've made is scrumptious, or precisely balanced nutritionally, or that it's what they should be feeding their kids. It's just a picture made out of food. I do my own thing, I make pictures out of food, that's where it begins and that's where it ends.

Now, there does exist a (large) bento community with whom I'm more-or-less loosely affiliated, in that a lot of my stuff shows up in bento boxes...I make oekakiben (picture bento). I'm not a mainstream bento-maker, though. If you're looking for nutritious ideas for an adorable lunch to send off with your preschooler, there are lots and lots of people who will have great information for you. You can browse flickr and see all kinds of appetizing combinations and great ideas for bento lunches. Do what you like. Bento is what you make it.

I eat what I make because I don't waste food. Blue rice, for all the reaction it seems to inspire in people, tastes like regular rice. It's just blue. It's tinted with natural food coloring, it's not harmful, it's just blue. The same goes for applesauce tinted blue and anything else I might have gone nuts and tinted blue at some point. Some people are fascinated with blue food. Some people find it repulsive. If you don't like it, you don't have to make it or eat it.

It's your choice. Everything is your choice...what ingredients to use, what recipes to make, what the nutritional balance should be, whether or not your rice is an orthodox color. You choose whether your sandwich looks like Hello Kitty or a monster or a good old no-frills sandwich.

Besides the me-vs-most-bento-makers comparison being a total apples-and-oranges thing, what's wrong with a little adventure? In my flickr profile (where I try to catch people on their way to announce to me what they think of blue rice), I mentioned chef Cat Cora and how fun her innovations can be. Cotton candy on soup gave her audience pause, but they swirled it in and found it delicious. This stuff can work.

Have you ever flipped through a magazine and seen one of those beef council ads, with the landscapes made of beef? There's brown sugar sand and sour cream snowcaps. Would you eat beef with brown sugar and sour cream? Probably not, but hey, it's a cool picture made of food. If it gives you a "hey, what if I..." moment, so much the better. And that's really all I'm doing.

Hope that helps clarify some things.

Tuesday, July 21, 2009

Be sure to check out this month's issue of Mothering...


It's this one, with the adorable baby girl on the cover. It's available at Barnes & Noble, Borders, Whole Foods and Babies R Us, among other places.

There's an excellent and surprisingly lengthy bento article inside, with how-tos. And I'm not just saying that because I contributed stuff...it's a really nice article. Well worth picking up. :)

Sunday, July 19, 2009

The gallery opening was wonderful...


I really enjoyed meeting everyone and the three-hour reception just flew by. I was amazed by how many people came in off the street to have a look.

It was a great chance to help broadcast the merits of bento, and wonderful to see lightbulbs going off in people's heads as they got inspired to do their own thing. People were also very interested in information about natural food colorings and a lot of people took literature on the colorings with them. The sake and plum wine at the wine bar were also greatly enjoyed ;)

Having a gallery show was a wonderful experience and I'm really grateful to have that opportunity. The opening reception was a lot of fun.

My bento images (not the fresh ones, but the photos) will be hanging in the Art Space of Yellow Springs, 108 Dayton Street, until mid-August. The gallery was open to the public on that first evening, but by appointment the rest of the time. If you'd like to see what's there, email me or the Arts Council...I can open up the gallery if there's a free spot on their schedule.

Here are some photos
from the opening reception. Thanks again, everyone :)

Thursday, June 18, 2009

Couple bits of news...

Number one, 501 Bento Box Lunches is just now coming out in the states. (If you have it pre-ordered under "500 Bento Box Lunches", don't sweat it...it's the same book. They just gave you a bonus.) It's a collaborative effort and showcases a lot of talented people. The photos are beautiful and...perhaps on purpose...the paperback is just about the same size as the squarish one-tier boxes, which I found cute.

I saw some complaints on various reviews about lack of recipes and such, and I know that I did submit recipes, so they must have had to edit a lot for space. I'll go ahead and re-post some of those recipes here as soon as I get them tracked down again, so that they'll be available to the curious. Sorry about that...the editors make all the final decisions with that stuff.

Also, I have a gallery show coming up next month. I'm still not clear on exactly how long it will be...I think I have the gallery for a month, but the opening is on July 17th in the Art Space in Yellow Springs, Ohio. Still got to nail a lot of those details down. Because I obviously can't leave a bunch of bento boxes out in a gallery for a month, there will only be "fresh examples" on opening night...the rest will be assorted photos that might be familiar from those who know my stuff on flickr. I'd like to do some new ones too....we'll see how that goes. I had no idea that prepping for a gallery show was so much work.

As far as I know, I still have some stuff up in the hallway of Giacomo's, too.

Thanks :)

Korero's 501 Bentos Site

Wednesday, June 17, 2009

Natural Food Colorings- Pros and Cons


Because I use fairly vivid color in so much of my stuff, I'm a pretty big target out there for people who like to lecture me on the dangers of all the artificial colorings they're sure I'm using. The big problem with this is that, being a lifelong cancer patient and extremely conscious of what nasty chemicals might be entering my body, I actually use natural colors whenever I can. If you think some of my combinations are weird on the surface, try beet-flavored rice with a trailing vine of wasabi on top.

My coloring of choice is India Tree, but around here it's difficult to come by. Stores that carry India Tree dragées, decorating sugars and candied flowers have a mysterious and conspicuous absence of their food coloring. I almost always have to order it. Sometimes boxes pop up on ebay, or you can get them at sites like this.

The ingredients (going straight off the box, here):

Blue: Deionized water, glycerin, red cabbage.
Red: Beet juice, citric acid.
Yellow: Deionized water, glycerin, curcumin.

All natural stuff, a little dab goes far, and like any basic set of food colorings you can mix just about any color you want by tinkering with combinations.

The big drawback to natural food colorings (and this includes vegetable juices in general), is that you never quite get the flavor of the original plant out of the end product. Depending on how much you use, your rice can taste vaguely of cabbage or beets. The eggwhite pieces you painstakingly dyed orange may retain a slight, barely perceptible touch of turmeric. And this is just fine with savory ingredients (especially if you love Desi food), but it can get a tad weird when you're working with sweet stuff.

Also, there aren't many "black" natural food colorings, apart from squid or cuttlefish ink, and if you're allergic to shellfish like I am, that can pose a bit of a problem.

So as much as I love to use natural colorings, and as much as the health benefits are worth the extra expense, when I'm cooking for others I can never be quite sure how they'd feel about turmeric-flavored frosting on a cake. So no, I don't use them exclusively.

A totally organic, totally natural food base is definitely the ideal, and I make those choices whenever I can, but it doesn't work out for me 100% of the time. Sometimes I will use a drop of the cheap artificial stuff from the grocery store baking aisle. Not a lot, and not often, but it happens sometimes. I look around me and see brightly colored candies, drinks, and lots of seemingly "healthy" items, and read the labels only to find they're loaded with artificial colorings. I think we're taking in more of the stuff than we know, so I'm going to count being Generally Conscious of it as being a step in the right direction.

If you look at some very popular Japanese bento foods, you'll see that most patterned kamaboko, also mamenori, are made with either vaguely "natural" or outright artificial colorings. (Carmine powder, for the record, is made from the shell of a particular type of beetle). Some companies are better about using natural colorings than others. Many Indian foods, particularly sweets, also use colorings extensively.

If you don't mind the higher price, I definitely recommend ordering some India Tree coloring and giving it a try. Taste for yourself and decide if it's something you'd like to incorporate. I'm trying to adopt an approach of moderation- use natural when I can, artificial in small doses. It's just a matter of reading labels, staying informed and making the choices that fit your lifestyle.

Monday, May 4, 2009

Tsumami (pinch)-style sakura sandwich tutorial


If you have a package of thin, cheapie lunchmeat (like Carl Buddig brand) and you're strapped for ideas, here's one option.

In my opinion, the prettiest effect is when these petals are anchored in a soft base-- couscous, hummus or guacamole. It's more realistic and you can add something pretty in the middle. But I didn't have any of that available, so I modified the flower to fit on a rye sandwich.


I use a hamburger mold for cutting circular sandwiches. It's the same thickness as a bread slice, it wastes less bread than a biscuit cutter and there's that handy scraper thing to dislodge it afterwards. I'm a big fan of the scraper thing because I don't like trying to dig the bread out.


The other good thing about cutting the bread with the hamburger mold is that it renders a circle that's almost the same size as the lunchmeat. Handy!

Ok, get a slice and spread it out on a flat surface,
like my cutting board here. If it curls, put the curly side downward so it'll be less irritating.


Fold it in half.


Fold the two corner points to the top middle, just as you would a tsumami flower.


Here's the second side folded over. It kind of makes a fan shape.


Flip the fan over so the folded side faces down.


Imagine a center line running from the top point to the bottom of the fan. Fold the edges inward toward that line. They might want to pop back, so you'll have to keep them pinned down with your fingers.


Here's the second corner folded inward.


Turn the petal back right side up. If the middle is puffy, gently curl the outer rim back up with your fingers.


Anchor the petal to the bread with a toothpick. If you were doing this in something soft, all you would need to do is tuck it in at an angle and it would stay put. If you're doing this on a sandwich and the design needs to survive shifting around, you might want to leave the toothpick in until you're ready to eat.


Make four more petals the same way and position them on the sandwich. See the flower coming together? Depending on how cooperative the lunchmeat is being, you might have to use more than one toothpick.

Since the petals aren't anchored into anything and the raw edges need to be covered, the center will need to be weighed down. There are lots of pretty ways to do this. I have a block of cheese, so I'll use that. Other options are zigzag-cut cherry tomatoes or quail eggs.


Here I'm using a gum-paste cutter, which is handy for thin and easily sliceable foods like hardboiled egg white and cheese. Bamboo cocktail forks are really handy for getting the detail-bits dislodged from small cutters without breaking the food apart.


Once you have that, all you have to do is position it in the middle and you're set! If the sandwich will be eaten quickly, the cheese is enough weight to hold the petals in place. If it's going on a trip, as I said, you might want to leave a toothpick in to keep everything together.


Friday, January 16, 2009

Mini-Gallery Show at Giacomo's Salon and Day Spa...

Some of my stuff (framed and everything!) can now, or very shortly, be seen at Giacomo's Salon and Day Spa in Troy, OH. Giacomo's is a gorgeous place in its own right. My bento pics are on the upper level, on the art wall across from the massage rooms. The "spa lady" is there, of course ;)

I also did some work for December's edition of Anorak, a great kids' magazine based in the UK. It's the chocolate edition, which means it has way more going for it than just my bento. I've really been jonesing for chocolate recently.

And, lastly, two things on the horizon...500 Bento Box Lunches is available for preorder on Amazon...should be out before too long...and I'm really looking forward to a gallery show in Yellow Springs this summer. Well, except for deciding on food for the gallery reception....doing food-based art puts a little bit of pressure on a person.

Thanks!

Monday, January 5, 2009

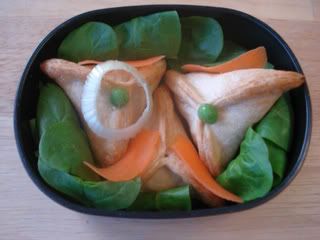
Quick and easy bento-size samosas...


We lovelovelove our spicy food around here. I was raised around desis and eat idlis and sambhar like there's no tomorrow; my boyfriend puts tabasco sauce on everything he eats.

There are some frozen "cocktail" samosas available at some Indian grocers, but I always find them expensive and a little greasy. The savory filling is the most appealing to me, because it can be customized to taste. I prefer my crusts to be dry and flaky, so I stayed away from the recipes that included a deep-fry stage. I experimented a little and came up with a combination I really like. You'll need:

  • 3 or 4 medium to large red potatoes, boiled in skins and cooled
  • 1/2 small can of baby peas (I use LeSueur)
  • 1 bottle of your favorite hot sauce (I use various types of tabasco)
  • jar of curry powder (I used Madras Hot curry, which oddly enough is not all that hot)
  • other spices (cinnamon, coriander, peppercorns, etc) to taste
  • 1 package refrigerated, rolled piecrusts...decent quality brand
  • drinking glass
  • small mixing bowl
  • teaspoon
  • fork
  • baking sheet
  • oven preheated to around 400 degrees F

First, take the cooled potatoes and slough off the skins with your fingers. They should peel off easily. Transfer the potatoes to a bowl and mash lightly with the fork...you don't have to whip them, but keep the chunks small. Add the half-can of peas and stir until well-integrated. Add hot sauce, curry powder and other spices to taste, mixing until incorporated. Set aside.

Spread out the piecrust on the baking sheet, one roll at a time. Use the drinking glass to cut out circles (it will help if you keep everything cool and dry...especially your hands...as you work). Stack the circles as they pile up, setting aside remnants to press out and cut again. From the two piecrusts, you should be able to get at least 15 circles.* When you've finished, fill the drinking glass with cool water and keep it nearby.

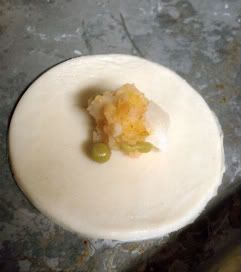
Using the baking sheet as a work surface, pluck one circle from the stack and use a fingertip to trace water around the outer edge. Take about half a teaspoonful of filling and place in the exact center of the circle:

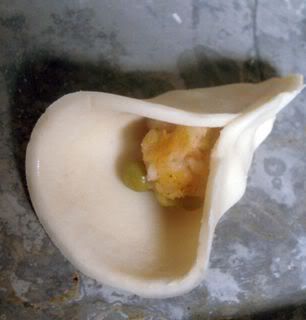
Now bring two edges up and over, and pinch half of it shut:

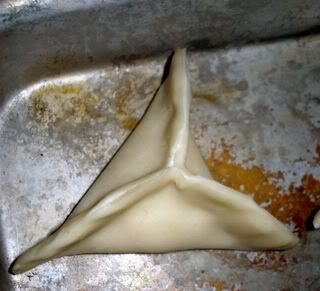
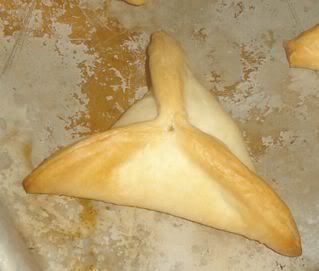
Bring the last edge up in the opposite direction, perpendicular to the first, and pinch the seams shut. The result will be a triangular little samosa:


Fill up the baking sheet, keeping them at least an inch apart for even heating (they don't expand much). Bake until golden brown:
A few minutes to cool and they're ready to eat. I like mine dipped in tamarind chutney, or even more tabasco sauce. Keep some milk or yogurt nearby, though, in case you're taken aback by the heat!


* I know there's going to be at least one person out there who tries to substitute prepackaged gyoza wrappers to cut out the piecrust step. I speak from experience when I say, don't do it! The gyoza are flimsier and more pasta-like and it just doesn't work at all, even when boiled first. It might produce a sloppy, spicy pierogi-wannabe, but not a samosa. ;)